Vuex 的基本概念
Vuex 是什么?
参考资料 官方文档
传统的组件之间共享数据的方式
- 父向子传值:
v-bind属性绑定 - 子向父传值:
v-on事件绑定 - 兄弟组件之间共享数据:
EventBus$on接收数据的那个组件$emit发送数据的那个组件
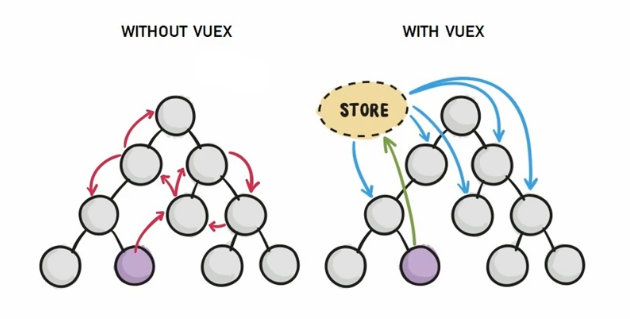
上面那种传递的方式很容易造成各个组件耦合度变高,本着 “高内聚,松耦合” 的原则急需一个集中管理的这些数据的工具
而 Vuex 是专门为 Vue.js 设计的状态(数据)管理库,它采用集中式存储管理应用的所有组件的状态,可以方便的实现组件之间的数据共享。说白了就像消息队列那样,所有服务都把数据发送到消息队列里面,同时监听是否有自己的消息从队列里发送过来。其好处是极大的解耦合,因为各个对象只需和这个消息队列打交道而无需对象之间进行调用
其核心概念就是下面这四个
- State
- Mutation
- Action
- Getter
搭建环境
参考资料 Vuex 安装
使用 CDN 链接的方式(在 Vue 之后引入 vuex 会进行自动安装)
可以在 Unpkg 里找到基于 NPM 的 CDN 链接,以上的链接会一直指向 NPM 上发布的最新版本(也可以通过 https://unpkg.com/vuex@2.0.0 这样的方式指定特定的版本。)
<script src="https://unpkg.com/vue"></script>
<script src="https://unpkg.com/vuex"></script>
使用 NPM 的方式
npm install vuex --save
或者直接使用 vue ui 创建,这样最简单
State 数据中心
State 提供唯一的公共数据源,所有共享的数据都要统一放到 Store 的 State 中进行存储
// 创建 store 数据源,提供唯一公共数据
const store = new Vuex.Store({
  state: {
    count: 0
  }
})
通过 this 访问
访问 State 中数据的第一种方式:
this.$store.state.全局数据名称
通过 mapState 访问
访问 State 中数据的第二种方式:使用 mapState 辅助函数
// 在单独构建的版本中辅助函数为 Vuex.mapState
import { mapState } from 'vuex'
通过刚才导入的 mapState 函数,将当前组件所需要的全局数据,映射为当前组件的 computed 计算属性
// 下面三种 count、countAlias、countPlusLocalState 的效果都是一样的
// 注意:在没有设置 setter 的情况下是无法向计算属性赋值的,下面使用展开运算符的方式也一样
export default {
  // ...
  computed: mapState({
    // 箭头函数可使代码更简练
    count: state => state.count,

    // 传字符串参数 'count' 等同于 `state => state.count`
    countAlias: 'count',

    // 为了能够使用 `this` 获取局部状态,必须使用常规函数
    countPlusLocalState (state) {
      return state.count + this.localCount
    }
  })
}
mapState 的简写
当映射的计算属性的名称与 state 的子节点名称相同时,也可以给 mapState 传一个字符串数组。
computed: mapState([
  // 映射 this.count 为 store.state.count
  'count'
])

// 或者这样(这里的 ... 不是省略号,其代表展开运算符,作用是全局数据映射为当前组件的计算属性)
// 更多这个对象展开运算符参考:https://github.com/tc39/proposal-object-rest-spread
computed: {
  ...mapState(['count'])
}
Mutation 通知数据变更
Mutation 用于变更 Store 中的数据
- 只能通过 Mutation 变更 Store 数据,不可以直接操作 Store 中的数据
- 通过这种方式虽然比较繁琐,但是可以集中监控所有数据的变化
Vuex 不允许直接通过的 this 的方式修改全局数据:如下
this.$store.state.count++
虽然不会报错,但是这样并不会触发 Vuex 的 “状态管理”,更改 Vuex 的 store 中的状态的唯一方法是提交 mutation。
Vuex 中的 mutation 非常类似于事件:每个 mutation 都有一个字符串的 事件类型(type) 和 一个 回调函数(handler)。这个回调函数就是我们实际进行状态更改的地方,并且它会接受 state 作为第一个参数:
// 定义 Mutation
const store = new Vuex.Store({
  state: {
    count: 1
  },
  mutations: {
    myAdd (state) {
      // 变更状态
      state.count++
    }
  }
})
不能直接调用一个 mutation handler。这个选项更像是事件注册:“当触发一个类型为 increment 的 mutation 时,调用此函数。” 要唤醒一个 mutation handler,需要以相应的 type 调用 store.commit 方法:
使用 this 提交更新
触发的第一种方式:
methods: {
  btnHandler01: function() {
    // 触发 mutation 的第一种方式
    this.$store.commit('myAdd')
  }
}
提交载荷(Payload):可以向 store.commit 传入额外的参数,即 mutation 的 载荷(payload):
myAddBy (state, step) {
  // 变更状态
  state.count += step
}

// 触发时直接传递参数
this.$store.commit('myAddBy', 3)
使用 mapMutations 更新
触发的第二种方式:
使用 mapMutations 辅助函数将组件中的 methods 映射为 store.commit 调用
import { mapMutations } from 'vuex'

export default {
  // ...
  methods: {
    ...mapMutations([
      'myAdd', // 将 `this.myAdd()` 映射为 `this.$store.commit('myAdd')`
      // `mapMutations` 也支持载荷:
      'myAddBy' // 将 `this.myAddBy(step)` 映射为 `this.$store.commit('myAddBy', step)`
    ]),
    ...mapMutations({
      add: 'myAdd' // 将 `this.add()` 映射为 `this.$store.commit('increment')`
    })
  }
}
注意:Mutation 必须是同步函数,因为 Mutation 并不知道异步函数什么时候执行完,所以会导致其不知道当前 State 会在什么时候变更状态,如果要进行异步操作就需要使用下一个工具 Action
mutations: {
  addAsync (state) {
    setTimeout(()=>{
      state.count++
    },1000)
  }
}
Action 异步更新数据
Action 类似于 Mutation,不同在于:
- Action 提交的是
mutation,而不是直接变更状态。 - Action 可以包含任意异步操作。
const store = new Vuex.Store({
  state: {
    count: 0
  },
  mutations: {
    add (state) {
      state.count++
    }
  },
  actions: {
    addAsync (context) {
      setTimeout(()=>{
        // 在 actions 中,不能直接修改 state 中的数据
        // 必须通过 context.commit() 触发某个已经定义的 mutation
        context.commit('add')
      },1000)
    }
  }
})
使用 this 提交异步任务
触发 Action 的第一种方式
methods: {
  handle (state) {
    this.$store.dispatch('addAsync')
  }
}
触发 Action 异步任务时携带参数
const store = new Vuex.Store({
  // ...
  actions: {
    addAsyncBy (context, step) {
      setTimeout(()=>{
        context.commit('add',step)
      },1000)
    }
  }
})
触发时携带参数
this.$store.dispatch('addAsyncBy', 3)
使用 mapActions 提交
触发 Action 的第二种方式:使用 mapActions 辅助函数将组件的 methods 映射为 store.dispatch 调用(需要先在根节点注入 store):
import { mapActions } from 'vuex'

export default {
  // ...
  methods: {
    ...mapActions([
      'addAsync', // 将 `this.addAsync()` 映射为 `this.$store.dispatch('addAsync')`

      // `mapActions` 也支持载荷:
      'addAsyncBy' // 将 `this.incrementBy(amount)` 映射为 `this.$store.dispatch('incrementBy', amount)`
    ]),
    ...mapActions({
      add: 'increment' // 将 `this.add()` 映射为 `this.$store.dispatch('increment')`
    })
  }
}
Getter 变更数据类型
Getter 用于对 Store 中的数据进行加工处理形成新的数据
const store = new Vuex.Store({
  // ...
  getters: {
    showNum : state => {
      return `当前最新的数量为: ${state.count}`
    }
  }
})
- Getter 可以对 Store 中已有的数据加工处理之后形成新的数据,类似 Vue 的计算属性
- Store 中数据发生变化,Getter 的数据也会跟着变化
使用 Getter 的第一种方式
this.$store.getters.名称
使用 Getter 的第二种方式:
mapGetters辅助函数
import { mapGetters } from 'vuex'

export default {
  // ...
  computed: {
  // 使用对象展开运算符将 getter 混入 computed 对象中
    ...mapGetters([
      'doneTodosCount',
      'anotherGetter',
      // ...
    ])
  }
}
如果想将一个 getter 属性另取一个名字,使用对象形式:
...mapGetters({
  // 把 `this.doneCount` 映射为 `this.$store.getters.doneTodosCount`
  doneCount: 'doneTodosCount'
})
Module 拆分为各个模块
由于使用单一状态树,应用的所有状态会集中到一个比较大的对象。当应用变得非常复杂时,store 对象就有可能变得相当臃肿。
为了解决以上问题,Vuex 允许我们将 store 分割成模块(module)。每个模块拥有自己的 state、mutation、action、getter、甚至是嵌套子模块(从上至下进行同样方式的分割)
const moduleA = {
  state: () => ({ ... }),
  mutations: { ... },
  actions: { ... },
  getters: { ... }
}

const moduleB = {
  state: () => ({ ... }),
  mutations: { ... },
  actions: { ... }
}

const store = new Vuex.Store({
  modules: {
    a: moduleA,
    b: moduleB
  }
})

store.state.a // -> moduleA 的状态
store.state.b // -> moduleB 的状态
在 Vue3 中使用 Vuex
Vue3 的 setup 函数中是没有 this 的,所以要使用从 vuex 4.X 中解构出 useStore 方法
<template>
  <div>
    <h2>{{ $store.state.count }}</h2>
    <button @click="plusCount">点击</button>
  </div>
</template>

<script>
import { useStore } from "vuex";

export default {
  setup(props, context) {
    const store = useStore(); // 使用useStore方法
    console.log(store);

    function plusCount() {
      store.commit("increaseCount");
    }
    return { plusCount };
  },
};
</script>
监听数据变化
import { watch } from 'vue'
import { useStore } from 'vuex'
export default {
  setup (props, context) {
    const $store = useStore()
    watch(() => $store.state.demo.count, (val, old) => {
      console.log(val, old)
    })
    return {}
  }
}
命名空间 namespaced
Vuex 由于使用单一状态树,应用的所有状态会集中到一个比较大的对象。当应用变得非常复杂时,store 对象就有可能变得相当臃肿。因此,Vuex 允许我们将 store 分割成模块(module),每个模块拥有自己的 state、mutation、action、getter、甚至是嵌套子模块。
默认情况下,模块内部的 action、mutation 和 getter 是注册在全局命名空间的,这样使得多个模块能够对同一 mutation 或 action 作出响应。如果希望你的模块具有更高的封装度和复用性,此时就用到了命名空间这个概念。
如何定义命名空间
可以在单个模块中通过添加 namespaced:true 的方式使其成为带命名空间的模块。
const moduleA ={
    namespaced:true,  //开启namespace:true,该模块就成为命名空间模块了
    state:{
        count:10,
        countA:888
    },
    getters:{...},
    mutations:{...},
    actions:{...}
}
如何取得命名空间的数据
1、基本方式:
this.$store.state.moduleA.countA
2、mapState辅助函数方式:
...mapState({
    count:state=>state.moduleB.countB
})
调用命名空间模块中的 getters
// 共有三种方式,如下:
//1.
commonGetter(){
    this.$store.getters['moduleA/moduleAGetter']
},
//2.
...mapGetters('moduleA',['moduleAGetter']),  // 此处的moduleA,不是以前缀的形式出现!!!

//3.别名状态下
...mapGetters({
    paramGetter:'moduleA/moduleAGetter'
}),
调用命名空间模块中的Mutations
//共有三种方式,如下:
//1,3 加个前缀moduleA/,都可以实现。2 使用辅助函数未变名称的特殊点!!!


//1.
commonMutation(){
    this.$store.commit('moduleA/moduleAMutation');
},

//2.
...mapMutations('moduleA',['moduleAMutation']),

//3.别名状态下
...mapMutations({
    changeNameMutation:'moduleA/moduleAMutation'